 Skip to content

Scalp micropigmentation deposits tiny dots of pigment into the upper layer of the scalp’s dermis to mimic the look of trimmed hair follicles. Most clients need 2 to 4 sessions, with a 3-session density protocol as the standard path for full coverage, and initial healing runs roughly 3 to 4 weeks. The Cleveland Clinic breaks this healing window into three stages, and peer-reviewed procedural work backs up the technical side, including needle depth targets around 0.5 mm. Enhanced Scalp builds every treatment plan around this same staged framework.
Here’s the short version before we get into the mechanics:
- Sessions: 2 to 4, commonly 3 spaced a week or two apart
- Healing: redness and mild swelling for days 1 to 5, flaking through day 10, color settling by day 30
- Aftercare priorities: no swimming, no heavy sweating, no direct sun for the first 10 days
- Longevity: results typically last 4 to 6 years before a refresh is needed
Key Takeaways
The SMP process succeeds when practitioners control needle depth precisely, stage density across multiple sessions, and clients follow strict early aftercare.
| Point | Details |
|---|---|
| Session count | Most clients need 2 to 4 sessions, commonly a 3-session density build spaced 1 to 2 weeks apart. |
| Needle depth is critical | Pigment deposited around 0.5 mm in the papillary dermis at a consistent angle produces the most natural, long-lasting dots. |
| Healing takes about a month | Expect redness through day 5, flaking and lightening through day 10, and final color by day 30. |
| Protect pigment early | Avoid swimming, sweating, and direct sun for the first 10 days after each session. |
| Results fade gradually | Pigment typically lasts 4 to 6 years before a touch-up restores density. |
| Enhanced Scalp approach | Enhanced Scalp builds treatment plans around conservative hairline design and the staged density protocol, including corrective work for prior poor SMP. |
Table of Contents
- What Is the SMP Process, and How Does It Differ From a Tattoo?
- How Should You Prepare for Your First SMP Session?
- What Happens Technically During an SMP Session?
- Why Does SMP Take Multiple Sessions Instead of One?
- How Does Healing Look Day by Day?
- What Aftercare Rules Actually Protect Your Results?
- What Are the Risks and Who Should Avoid SMP?
- How Long Do Results Last, and What Does a Touch-Up Involve?
- What the Research Actually Tells Us About This Process
- Ready to Start Your Own SMP Treatment Plan?
- Sources
- FAQ
What Is the SMP Process, and How Does It Differ From a Tattoo?
Scalp micropigmentation is not a tattoo, even though both use a needle and pigment. Traditional tattoo ink sits deep in the dermis and uses continuous lines. SMP uses a pointillism technique, dozens of tiny individual dots placed shallower, in the papillary dermis, to replicate the look of a hair follicle emerging from skin.
There are two practical outcome paths, and figuring out which one applies to you shapes everything else about your treatment plan:
- Shaved-head reconstruction: full pigmentation across the scalp to simulate a closely buzzed head, typically chosen by men at higher Norwood stages
- Density camouflage: pigment woven between existing hair to reduce the scalp-to-hair contrast that makes thinning look worse than it is
Some clients combine SMP with a hair transplant, using pigmentation to camouflage scarring or add density around a graft line. Enhanced Scalp treats both male pattern baldness and scalp micropigmentation for women under this same two-path logic, since density needs and hairline goals differ substantially between the two.
How Should You Prepare for Your First SMP Session?
Your first appointment is mostly a consultation, not a treatment. A practitioner maps your hairline against your facial geometry, assesses your Norwood stage, and, critically, designs a hairline conservative enough to still look natural if your hair loss progresses further. This is the step people underestimate most, and it’s why portfolio work matters more than marketing copy.
- Get your Norwood stage assessed and discuss hairline placement options, including how age and future loss should factor into the design.
- Stop aspirin, NSAIDs, vitamin E, Ginkgo biloba, and ginseng about a week out. These interfere with clotting and can affect how cleanly pigment deposits, according to peer-reviewed procedural standards.
- Disclose any medical conditions, medications, or allergies, especially anything affecting skin healing or immune response.
- Wash your hair the morning of your appointment and skip styling products. Bring a few recent photos showing your hairline from when hair loss was less advanced.
- Block out recovery time. You won’t need bed rest, but you’ll want to avoid workouts and sun exposure for over a week afterward.
- Expect a consent form and before photos. For scarred areas, a test patch is often recommended to check retention before committing to full treatment.
Pro Tip: Bring old photos of your hairline from your early 20s, even if it looks nothing like it does now. A good practitioner uses that reference to keep the new hairline age-appropriate rather than accidentally recreating a look you had at 19.
What Happens Technically During an SMP Session?
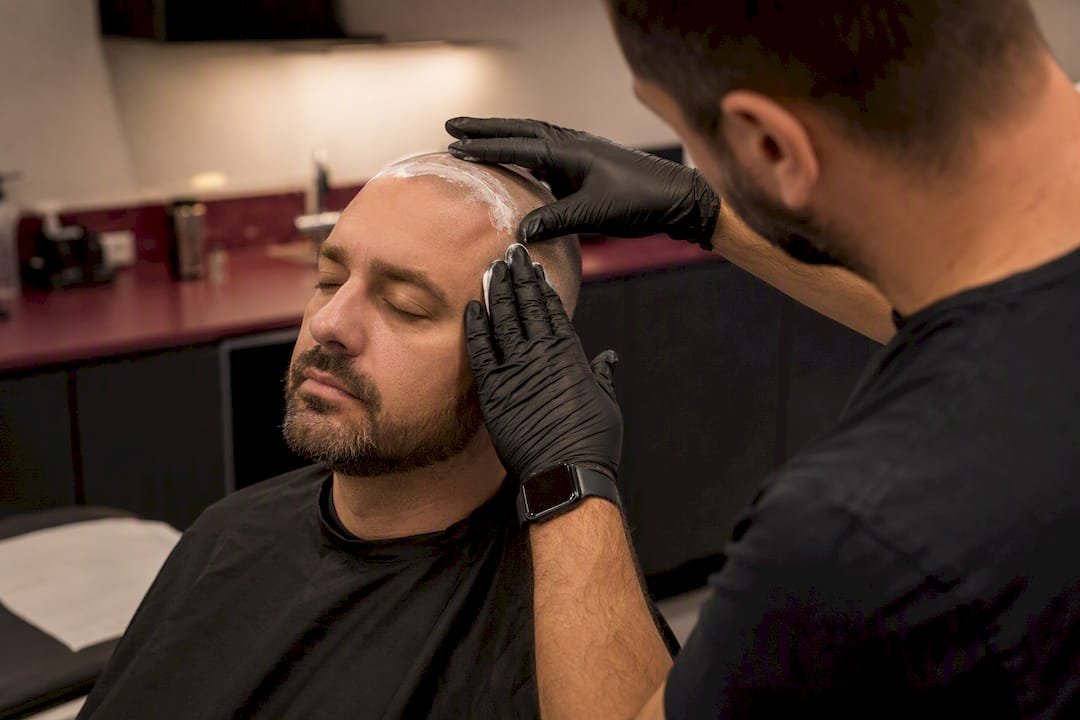
This is where practitioner skill actually separates a natural result from an obvious one. A technician uses a micro-needle, either single-prong for hairline precision or multi-prong for filling larger areas, to deposit pigment dot by dot.
Depth matters more than almost anything else in this process. Peer-reviewed procedural research points to an ideal deposition depth in the papillary dermis, around 0.5 mm, held at a consistent 90-degree angle. Go shallower and pigment fades unevenly or vanishes within months. Go deeper and dots blur into soft, ink-blot smudges instead of crisp follicle-like points, sometimes migrating under the skin permanently.
- Needle angle and depth consistency are, according to the PMC procedural study, the single biggest factor in whether results look natural years later.
- Rotor speed and contact time are adjusted per area. Scalp tissue over bone behaves differently than tissue near a scar.
- Pigment used in SMP is iron-oxide or carbon-based and formulated with a thinner viscosity than tattoo ink, specifically so it fades gradually and evenly instead of shifting blue or green with age.
One technical fact worth knowing going in: the PMC study notes that scarred or atrophic tissue absorbs pigment less predictably than healthy scalp, which is exactly why practitioners recommend a test patch before treating scar camouflage cases at full scale.
Most clients tolerate the sensation well. Topical numbing is common, sessions run 2 to 5 hours depending on coverage area, and the Cleveland Clinic describes it as generally less uncomfortable than a traditional tattoo, since the needles are finer and placement is shallower. Right after treatment, the scalp looks darker and more saturated than the final result. That’s expected, not a sign of overwork.
Why Does SMP Take Multiple Sessions Instead of One?
Density gets built in layers on purpose. Trying to achieve full coverage in a single pass risks over-saturation, blurred dots, and a result that reads as painted rather than natural.
- Session 1 lays a sparse base layer, often starting around a lighter dot density to establish the hairline and overall pattern.
- Session 2, typically 1 to 2 weeks later, builds on that base once the practitioner can see how the first layer healed and retained.
- Session 3 refines edges, fills any gaps, and brings density to its final target.
This staged approach, described by Charles Medical Group as a validated protocol, exists because pigment retention varies from person to person. Spacing sessions a week or two apart lets a practitioner see actual healed results before adding more. Across three sessions, expect somewhere between 6 and 15 total hours in the chair, depending on scalp size and whether you’re doing shaved reconstruction, density work, or corrective SMP over old tattooing or a botched prior job. Scar work and corrective cases often need an added session or two beyond the standard three.
How Does Healing Look Day by Day?
Healing follows a fairly predictable arc, and the Cleveland Clinic documents it in three clear phases. Knowing what’s normal at each stage keeps you from panicking over something that’s just your scalp doing what it’s supposed to do.
| Timeframe | What’s happening | What to do |
|---|---|---|
| Days 1–5 | Redness, mild swelling, pigment looks darker and more saturated than final result | Keep scalp dry, avoid touching or scratching |
| Days 6–10 | Skin flakes or scabs lightly as the epidermis turns over; pigment can appear 10–30% lighter | No swimming, no heavy sweating, no direct sun |
| Day 10 onward | Color stabilizes and the true, final shade becomes visible | Resume normal routine gradually, start SPF |
The lightening in the middle stretch surprises a lot of clients. It’s normal epidermal turnover, not pigment failure. The color that shows up after day 30 is the one that’s actually going to stick. Density work tends to heal slightly faster than full shaved-head coverage simply because there’s less total treated surface area. Scar tissue, on the other hand, can heal unevenly and sometimes needs a follow-up patch to correct spots where pigment didn’t take.
Contact your clinic if you notice spreading redness beyond the treated area, pus, fever, or pigment that seems to be disappearing in patches rather than fading evenly. That’s outside the range of normal healing and worth a call, not a wait-and-see.
What Aftercare Rules Actually Protect Your Results?
Aftercare in the first 10 days does more to protect your final result than almost anything that happens during the session itself.
- Wait at least 3 to 4 days before the first gentle wash, and even then, use lukewarm water and your hands only, no washcloth or scrubbing.
- Skip swimming, saunas, steam rooms, and anything that makes you sweat heavily for the full 10-day window the Cleveland Clinic recommends.
- Avoid direct sun exposure entirely for the first 10 days, then introduce a daily SPF 30 or higher once healing is complete.
- Use a mild, fragrance-free cleanser once you resume washing, nothing exfoliating or medicated.
- Let scabs or flakes fall off naturally. Picking at them pulls out pigment along with the skin.
- Hold off on haircuts, hair dye, or other scalp treatments for at least 4 weeks to let pigment fully settle.
Pro Tip: If your scalp looks noticeably lighter around day 7, resist the urge to book an emergency touch-up. That’s mid-healing lightening, and most of that color comes back as the skin finishes turning over by day 30.
What Are the Risks and Who Should Avoid SMP?
Mild redness, tenderness, and light scabbing are normal and expected. Signs of a real problem look different: spreading warmth, pus, fever, or pigment that patches out unevenly instead of settling.
- Disclose autoimmune conditions, keloid tendencies, or active skin conditions on the scalp before booking.
- Blood thinners, certain supplements, and some skin medications can affect deposition and healing.
- Scar tissue behaves less predictably than healthy scalp, which is why a test patch is often recommended before full treatment on scarred areas.
- A practitioner’s healed portfolio, not just fresh-session photos, is the clearest evidence of consistent needle depth and technique.
How Long Do Results Last, and What Does a Touch-Up Involve?
SMP pigment is formulated to fade gradually and evenly over roughly 4 to 6 years, rather than shifting blue or green the way tattoo ink can. UV exposure and aggressive exfoliation both speed that fade along.
- A touch-up session typically takes a few hours and restores density to areas that faded unevenly.
- If your hair color changes significantly, a touch-up can adjust pigment tone to match.
- Planning a future hair transplant on top of SMP is possible but should be discussed with your practitioner in advance.
- Corrective SMP addresses uneven retention or dated, poorly executed prior work, often the most complex cases a clinic handles.
Why Practitioner Experience Changes the Outcome
Enhanced Scalp specializes in conservative hairline design specifically because an overly aggressive hairline ages badly. A hairline drawn too low or too sharp for someone’s bone structure looks fine at 30 and wrong at 50. Corrective SMP, training programs for new practitioners, and documented healed results all matter here, because retention and naturalness show up months later, not in the mirror on treatment day.
What the Research Actually Tells Us About This Process
Most articles on scalp micropigmentation treat it like a haircut: show up, get it done, walk out looking different. That framing undersells what’s actually happening. The technical margin between a result that reads as real hair and one that reads as a tattoo is about half a millimeter of needle depth and a consistent angle held over thousands of individual dots.
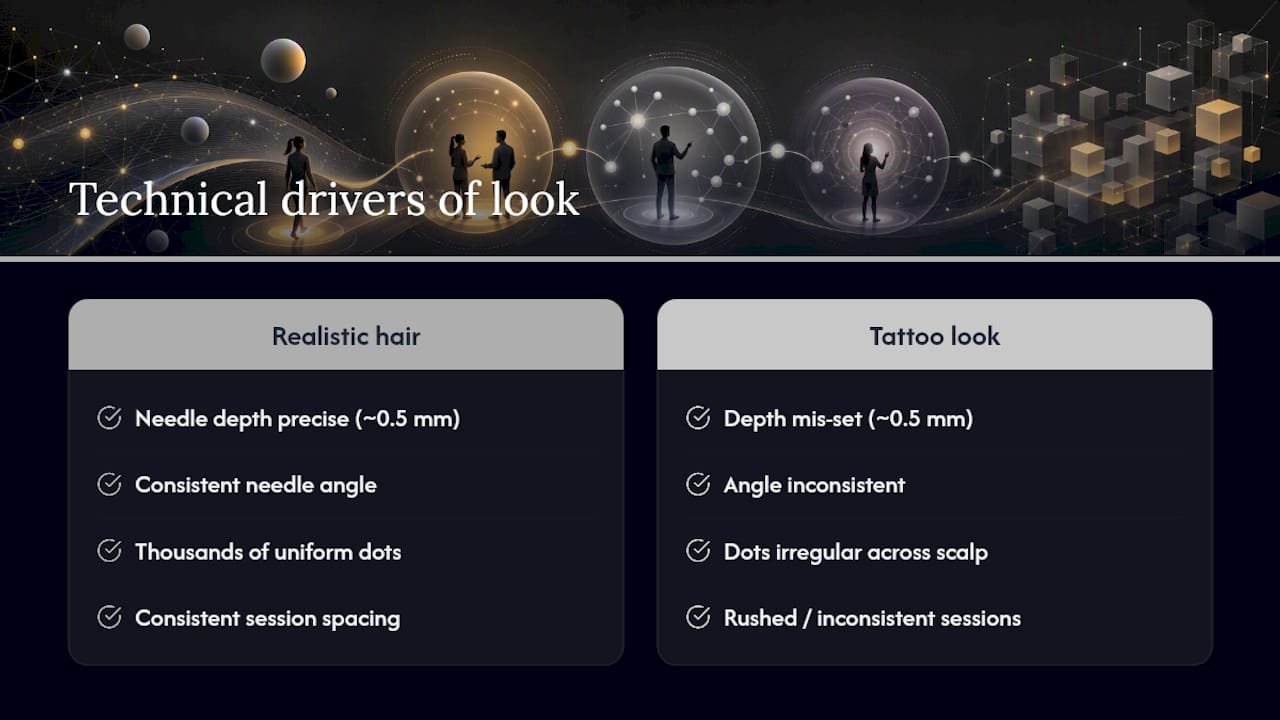
Conventional advice tends to fixate on finding the cheapest session count, when the real variable that determines outcome quality is practitioner consistency across sessions, not the number of them. A rushed two-session plan on someone who needed the full three-session density build almost always shows in the healed result, usually as patchy density or a hairline that reads too uniform to pass as organic.
If you take one thing from this, prioritize evidence of healed work over pre-healing photos, and ask directly about needle depth and session spacing before booking. Anyone who can’t answer those questions plainly probably shouldn’t be holding the needle.
— James Christopher
Ready to Start Your Own SMP Treatment Plan?
Enhanced Scalp built its process around exactly what this guide walks through: conservative hairline design, the staged 3-session density protocol, and needle technique that targets that critical 0.5 mm depth for results that hold up years later, not just in the first healed photo. That’s the difference between a clinic chasing a fast booking and one documenting healed, long-term work.
Whether you’re dealing with early thinning, a receded hairline, or correcting a previous SMP job that didn’t heal right, Enhanced Scalp’s scalp micropigmentation services cover shaved reconstruction, density camouflage, and corrective work for prior poor SMP or transplant scarring. If you’re an aspiring practitioner instead, the training program teaches the same parameter control covered above. Book a consultation to get your hairline mapped and your session plan built around your specific Norwood stage and goals.
Sources
- Scalp Micropigmentation: Before & After, Benefits, Side Effects — Cleveland Clinic
- Clinical studies and procedural standardization for scalp micropigmentation — PMC (peer-reviewed)
- Scalp Micropigmentation what is it explained — Charles Medical Group
FAQ
What Is an SMP Procedure?
Scalp micropigmentation is a non-surgical cosmetic treatment that deposits tiny dots of pigment into the scalp’s upper dermis to mimic the look of short, trimmed hair follicles, used for both shaved-head reconstruction and density camouflage.
How Long Does an SMP Session Take?
A single session typically runs 2 to 5 hours depending on the size of the treatment area, and most clients complete their full plan across 2 to 4 sessions.
What Are the Disadvantages of SMP Hair Treatment?
SMP requires an initial healing period of 3 to 4 weeks with activity restrictions, results fade gradually over 4 to 6 years and need touch-ups, and outcomes depend heavily on practitioner skill with needle depth and hairline design.
How Long Does It Take for SMP to Fully Heal?
Full healing typically takes 3 to 4 weeks, moving through initial redness and swelling in days 1 to 5, flaking and temporary lightening through day 10, and pigment stabilization by day 30, according to Cleveland Clinic guidance.

